* made edits to multicloud docs

* additional edits

* additional edits

* made changes based on suggestions

Co-authored-by: Amruta Ranade <11484018+Amruta-Ranade@users.noreply.github.com>
16 KiB
Managing Airbyte Cloud
This page will help you manage your Airbyte Cloud workspaces and understand Airbyte Cloud limitations.
Manage your Airbyte Cloud workspace
An Airbyte Workspace allows you to collaborate with other users and manage connections under a shared billing account.
:::info Airbyte credits are assigned per workspace and cannot be transferred between workspaces. :::
Add users to your workspace
To add a user to your workspace:
-
On the Airbyte Cloud dashboard, click Settings in the navigation bar.
-
In the Workspace Settings sidebar, click Access Management.
-
Click + New user.
-
On the Add new users dialog, enter the email address of the user you want to invite to your workspace. Click Send invitation.
:::info The user will have access to only the workspace you invited them to. Also note that they will be added as a workspace admin by default. :::
Remove users from your workspace
To remove a user from your workspace:
-
On the Airbyte Cloud dashboard, click Settings in the navigation bar.
-
In the Workspace Settings sidebar, click Access Management.
-
Click Remove next to the user’s name.
-
The Remove user dialog displays. Click Remove.
Rename a workspace
To rename a workspace:
-
On the Airbyte Cloud dashboard, click Settings in the navigation bar.
-
In the Workspace Settings sidebar, click General Settings.
-
In the Workspace name field, enter the new name for your workspace. Click Save.
Delete a workspace
To delete a workspace:
-
On the Airbyte Cloud dashboard, click Settings in the navigation bar.
-
In the Workspace Settings sidebar, click General Settings.
-
Click Delete your workspace.
Single workspace vs. multiple workspaces
You can use one or multiple workspaces with Airbyte Cloud.
Access
| Number of workspaces | Benefits | Considerations |
|---|---|---|
| Single | All users in a workspace have access to the same data. | If you add a user to a workspace, you cannot limit their access to specific data within that workspace. |
| Multiple | You can create multiple workspaces to allow certain users to access the data. | Since you have to manage user access for each workspace individually, it can get complicated if you have many users in multiple workspaces. |
Billing
| Number of workspaces | Benefits | Considerations |
|---|---|---|
| Single | You can use the same payment method for all purchases. | Credits pay for the use of resources in a workspace when you run a sync. Resource usage cannot be divided and paid for separately (for example, you cannot bill different departments in your organization for the usage of some credits in one workspace). |
| Multiple | Workspaces are independent of each other, so you can use a different payment method card for each workspace (for example, different credit cards per department in your organization). | You can use the same payment method for different workspaces, but each workspace is billed separately. Managing billing for each workspace can become complicated if you have many workspaces. |
Switch between multiple workspaces
To switch between workspaces:
-
On the Airbyte Cloud dashboard, click the current workspace name under the Airbyte logo in the navigation bar.
-
Click View all workspaces.
-
Click the name of the workspace you want to switch to.
Choose your default data residency
Default data residency allows you to choose where your data is processed.
:::note
Configuring default data residency only applies it to new connections and does not affect existing connections.
:::
For individual connections, you can choose a data residency that is different from the default through connection settings or when you create a new connection.
:::note
While the data is processed in a data plane in the chosen residency, the cursor and primary key data is stored in the US control plane. If you have data that cannot be stored in the US, do not use it as a cursor or primary key.
:::
To choose your default data residency:
-
On the Airbyte Cloud dashboard, click Settings in the navigation bar.
-
In the Workspace settings sidebar, click Data Residency.
-
Click the dropdown and choose the location for your default data residency.
-
Click Save changes.
:::info
Depending on your network configuration, you may need to add IP addresses to your allowlist.
:::
Manage Airbyte Cloud notifications
To set up Slack notifications:
-
On the Airbyte Cloud dashboard, click Settings in the navigation bar.
-
In the Workspace Settings sidebar, click Notifications.
-
Navigate back to the Airbyte Cloud dashboard > Settings > Notifications and enter the Webhook URL. Click Save changes.
-
Toggle the Send notifications when sync fails and Send notifications when sync succeeds buttons as required.
Understand Airbyte Cloud limits
Understanding the following limitations will help you better manage Airbyte Cloud:
- Max number of workspaces per user: 100
- Max number of sources in a workspace: 100
- Max number of destinations in a workspace: 100
- Max number of connection in a workspace: 100
- Max number of streams that can be returned by a source in a discover call: 1K
- Max number of streams that can be configured to sync in a single connection: 1K
- Size of a single record: 100MB
- Shortest sync schedule: Every 60 min
- Schedule accuracy: +/- 30 min
View the sync summary
The sync summary displays information about the data moved during a sync.
To view the sync summary:
-
On the Airbyte Cloud dashboard, click Connections in the navigation bar.
The Connections page displays.
-
Click a connection in the list to view its sync history.
Sync History displays the sync status or reset status (Succeeded, Partial Success, Failed, Cancelled, or Running) and the sync summary.
:::note
Airbyte will try to sync your data three times. After a third failure, it will stop attempting to sync.
:::
-
To view the full sync log, click the sync summary dropdown.
Sync summary
| Data | Description |
|---|---|
| x GB (also measured in KB, MB) | Amount of data moved during the sync. If basic normalization is on, the amount of data would not change since normalization occurs in the destination. |
| x emitted records | Number of records read from the source during the sync. |
| x committed records | Number of records the destination confirmed it received. |
| xh xm xs | Total time (hours, minutes, seconds) for the sync and basic normalization, if enabled, to complete. |
:::note
In a successful sync, the number of emitted records and committed records should be the same.
:::
Edit stream configuration
-
On the Airbyte Cloud dashboard, click Connections in the navigation bar and then click a connection in the list you want to change.
The Connection page displays.
-
Click Replication.
The Replication tab displays.
The Transfer and Streams settings include the following parameters:
| Parameter | Description |
|---|---|
| Replication Frequency | How often the data syncs |
| Destination Namespace | Where the replicated data is written |
| Destination Stream Prefix | Helps you identify streams from different connectors |
:::note
These parameters apply to all streams in the connection.
:::
If you need to use cron scheduling:
- In the Replication Frequency dropdown, click Cron.
- Enter a cron expression and choose a time zone to create a sync schedule.
:::note
- Only one sync per connection can run at a time.
- If cron schedules a sync to run before the last one finishes, the scheduled sync will start after the last sync completes.
- Cloud does not allow schedules that sync more than once per hour.
:::
In the Activate the streams you want to sync section, you can make changes to any stream you choose.
To search for a stream:
-
Click the Search stream name search box.
-
Type the name of the stream you want to find.
-
Streams matching your search are displayed in the list.
To change individual stream configuration:
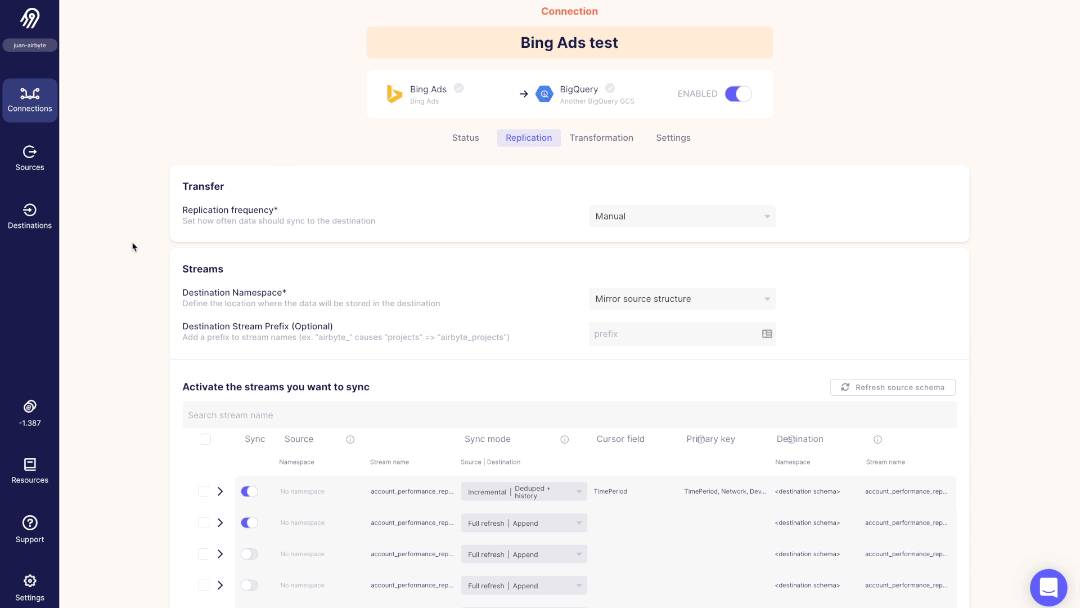
-
In the Sync column of the stream, toggle the sync on or off.
-
Click the dropdown arrow in the Sync mode column and select the sync mode you want to apply.
:::note
Depending on the sync mode you select, you may need to choose a cursor or primary key.
:::
- If there is a dropdown arrow in the Cursor or Primary key fields, click the dropdown arrow and choose the cursor or primary key.
To change multiple stream configurations:
-
Click the first checkbox in the table header to select all streams in the connection.
-
Deselect the checkboxes of streams you do not want to apply these changes to.
-
In the highlighted header of the table, toggle the sync on or off.
-
Click the dropdown arrow in the Sync mode column and select the sync mode you want to apply to these streams.
-
If there is a dropdown arrow in the Cursor or Primary key fields of the highlighted table header, click the dropdown arrow and choose the cursor or primary key.
-
Click Apply to apply these changes to the streams you selected, or click Cancel to discard the changes.
To save the changes:
-
Click Save changes, or click Cancel to discard the changes.
-
The Stream configuration changed dialog displays. This gives you the option to reset streams when you save the changes.
:::caution
Airbyte recommends that you reset the streams. A reset will delete data in the destination of the affected streams and then re-sync that data. Skipping the reset is discouraged and might lead to unexpected behavior.
:::
- Click Save connection, or click Cancel to close the dialog.
To refresh the source schema:
-
Click Refresh source schema to fetch the schema of your data source.
-
If there are changes to the schema, the Refreshed source schema dialog displays them.
Display Connection State
Connection State provides additional information about incremental syncs. It includes the most recent values for the global or stream-level cursors, which can aid in debugging or determining which data will be included in the next syncs.
To display Connection State:
-
On the Airbyte Cloud dashboard, click Settings in the navigation bar.
-
In the Workspace Settings sidebar, click General Settings.
-
Toggle Enable advanced mode and click Save changes.
-
Click Connections in the navigation bar and then click the connection in the list you want to display.
-
Click the Settings tab on the Connection page.
The Connection State displays.
Choose the data residency for a connection
You can choose the data residency for your connection in the connection settings. You can also choose data residency when creating a new connection, or you can set the default data residency for your workspace.
To choose the data residency for your connection:
-
On the Airbyte Cloud dashboard, click Connections in the navigation bar and then click the connection that you want to change.
The Connection page displays.
-
Click the Settings tab.
-
Click the Data residency dropdown and choose the location for your default data residency.
:::note
Changes to data residency will not affect any sync in progress.
:::
Buy credits
This section guides you through purchasing credits on Airbyte Cloud. An Airbyte credit is a unit of measure used to pay for Airbyte resources when you run a sync.
To buy credits:
-
On the Airbyte Cloud dashboard, click the coin icon in the navigation bar.
The Credits page displays.
-
If you are unsure of how many credits you need, click Talk to Sales to find the right amount for your team.
-
Click Buy credits. The Stripe payment page displays.
-
If you want to change the amount of credits, click Qty 200. The Update quantity dialog displays, and you can either type the amount or use minus (-) or plus (+) to change the quantity. Click Update.
:::note Purchase limits:
- Minimum: 100 credits
- Maximum: 999 credits :::
To buy more credits or a subscription plan, reach out to Sales.
-
Fill out the payment information.
After you enter your billing address, sales tax is calculated and added to the total.
-
Click Pay.
Your payment is processed, and the Credits page displays the updated quantity of credits, total credit usage, and the credit usage per connection.
A receipt for your purchase is sent to your email. Email us for an invoice.
:::note
Credits expire after one year if they are not used.
:::