* Fix errors in education product

* Fix errors in admin configuration docs

* Fix a few stray errors

* This works as is

* Sundry fixes picked up by Vale

* Another batch

* Today's batch of content fixes

* Sundry fixes

* More small updates

* Don't introduce a typo when we're trying to fix them

* Update content/admin/authentication/using-ldap.md

Co-authored-by: Laura Coursen <lecoursen@github.com>

Co-authored-by: Laura Coursen <lecoursen@github.com>
5.9 KiB
title, intro, product, versions
| title | intro | product | versions | ||
|---|---|---|---|---|---|
| Using Codespaces in Visual Studio | You can develop in your codespace directly in {% data variables.product.prodname_vs %} by connecting with your account on {% data variables.product.product_name %}. | {% data reusables.gated-features.codespaces %} |
|
{% note %}
Note: {% data variables.product.prodname_codespaces %} is currently in limited public beta and subject to change. During the beta period, {% data variables.product.prodname_dotcom %} does not make any guarantees about the availability of {% data variables.product.prodname_codespaces %}. Sign up for the limited public beta. For more information about joining the beta, see "About {% data variables.product.prodname_codespaces %}."
{% endnote %}
About codespaces in {% data variables.product.prodname_vs %}
You can create a codespace in {% data variables.product.prodname_vs %} to develop applications in a Windows environment. When you use a codespace in {% data variables.product.prodname_vs %}, you can browse source code, build solutions, and commit changes to your repository.
You must create a codespace in {% data variables.product.prodname_vs %} to use it with the application. Codespaces created outside of {% data variables.product.prodname_vs %} can not currently be used with {% data variables.product.prodname_vs %}.
Prerequisites
Before you configure a codespace in {% data variables.product.prodname_vs %}, you must download the latest version of {% data variables.product.prodname_vs %} Preview.
Enabling the connection between {% data variables.product.prodname_vs %} and {% data variables.product.prodname_github_codespaces %}
Connecting to {% data variables.product.prodname_github_codespaces %} with the {% data variables.product.prodname_vs %} Preview is not enabled by default, so you will first need to enable the Preview Features option.
- In {% data variables.product.prodname_vs %} Preview, use the Tools drop-down menu, then click Options.
- Under Environment, select Preview Features and check the Connect to {% data variables.product.prodname_github_codespaces %} preview feature.
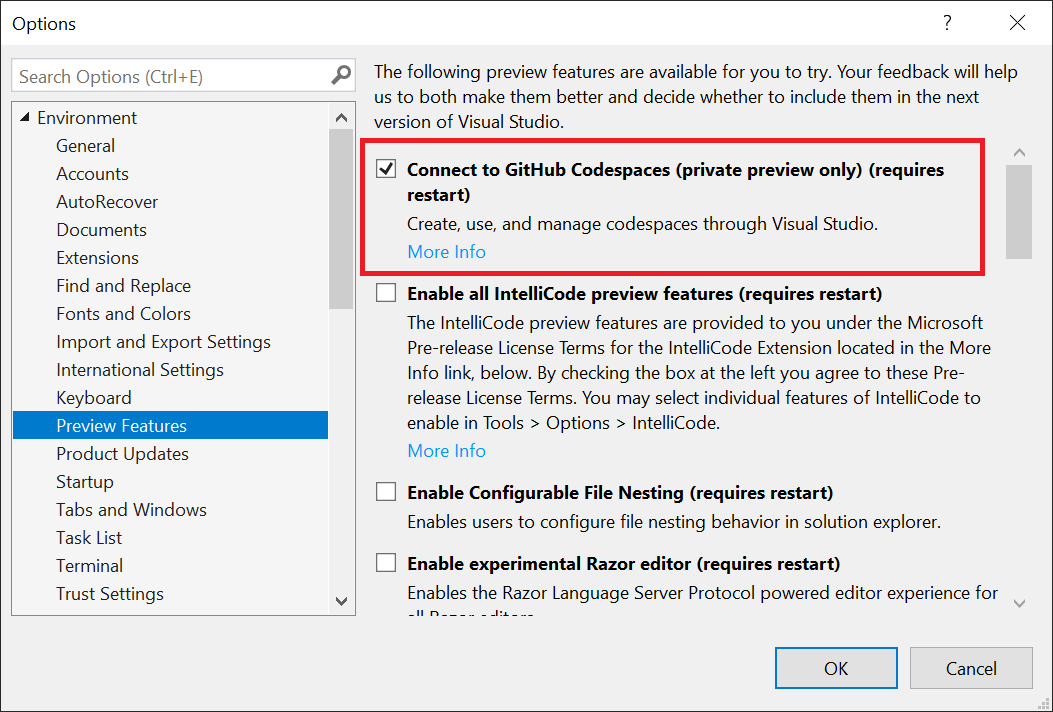
- You will need to restart {% data variables.product.prodname_vs %} for the feature to be available.

Creating a codespace in {% data variables.product.prodname_vs %}
- When you launch {% data variables.product.prodname_vs %}, the Start Window will show a Connect to a codespace button under "Get started".

- Click Connect to a codespace.
- Click Sign in to {% data variables.product.prodname_dotcom %} and follow the prompts, or click Create one! to create a new {% data variables.product.prodname_dotcom %} account and sign into the account.

- Under "Codespace details", type the repository's URL you want {% data variables.product.prodname_github_codespaces %} to clone into your codespace.
- Optionally, use the Instance type and Suspend after drop-down menus to configure more codespace details.

- Click Create and Connect. {% data variables.product.prodname_github_codespaces %} will begin preparing the codespace and open {% data variables.product.prodname_vs %} after the codespace is ready. The codespace name will appear in the remote indicator in the menu.


Opening a codespace in {% data variables.product.prodname_vs %}
- Use the File drop-down menu, and click Connect to a Codespace.

- Under "{% data variables.product.prodname_github_codespaces %}", click the codespace you want to connect to, then click Connect.


Configuring a codespace for {% data variables.product.prodname_vs %}
A codespace, created with {% data variables.product.prodname_vs %}, can be customized through a new tool called devinit, a command line tool included with {% data variables.product.prodname_vs %}.
devinit
devinit lets you install additional frameworks and tools into your Windows development codespaces, modify environment variables, and more.
devinit supports a configuration file called devinit.json. You can add this file to your project if you want to create a customized and repeatable development environment. When you use devinit with a devcontainer.json file, your codespaces will be automatically configured on creation.
For more information about Windows codespace configuration and devinit, see Customize a codespace in the {% data variables.product.prodname_vs %} documentation. For more information about devinit, see Getting started with devinit.