20 KiB
title, shortTitle, intro, product, permissions, redirect_from, versions, type, topics
| title | shortTitle | intro | product | permissions | redirect_from | versions | type | topics | ||||||||||||||||||
|---|---|---|---|---|---|---|---|---|---|---|---|---|---|---|---|---|---|---|---|---|---|---|---|---|---|---|
| Setting up code scanning for a repository | Set up code scanning | You can set up {% data variables.product.prodname_code_scanning %} by adding a workflow to your repository. | {% data reusables.gated-features.code-scanning %} | If you have write permissions to a repository, you can set up or configure {% data variables.product.prodname_code_scanning %} for that repository. |
|
|
how_to |
|
{% data reusables.code-scanning.beta %} {% data reusables.code-scanning.enterprise-enable-code-scanning-actions %}
Options for setting up {% data variables.product.prodname_code_scanning %}
You decide how to generate {% data variables.product.prodname_code_scanning %} alerts, and which tools to use, at a repository level. {% data variables.product.product_name %} provides fully integrated support for {% data variables.product.prodname_codeql %} analysis, and also supports analysis using third-party tools. For more information, see "About {% data variables.product.prodname_code_scanning %}."
{% data reusables.code-scanning.enabling-options %}
{% ifversion fpt or ghes > 3.4 or ghae-issue-6251 or ghec %} {% data reusables.code-scanning.about-analysis-origins-link %} {% endif %}
{% ifversion ghes or ghae %} {% note %}
Note: If you want to use the CodeQL analysis, note that this article describes the features available with the version of the CodeQL action and associated CodeQL CLI bundle included in the initial release of this version of {% data variables.product.product_name %}. If your enterprise uses a more recent version of the CodeQL action, see the {% data variables.product.prodname_ghe_cloud %} article for information on the latest features. {% ifversion not ghae %} For information on using the latest version, see "Configuring code scanning for your appliance."{% endif %}
{% endnote %} {% endif %}
{% ifversion ghae %}
Prerequisites
Before setting up {% data variables.product.prodname_code_scanning %} for a repository, you must ensure that there is at least one self-hosted {% data variables.product.prodname_actions %} runner available to the repository.
Enterprise owners, organization and repository administrators can add self-hosted runners. For more information, see "About self-hosted runners" and "Adding self-hosted runners." {% endif %}
{% ifversion fpt or ghec %}
Setting up {% data variables.product.prodname_code_scanning %} using starter workflows
{% data reusables.advanced-security.starter-workflows-beta %}
{% ifversion ghes or ghae %} {% note %}
Note: This article describes the features available with the version of the CodeQL action and associated CodeQL CLI bundle included in the initial release of this version of {% data variables.product.product_name %}. If your enterprise uses a more recent version of the CodeQL action, see the {% data variables.product.prodname_ghe_cloud %} article for information on the latest features. {% ifversion not ghae %} For information on using the latest version, see "Configuring code scanning for your appliance."{% endif %}
{% endnote %} {% endif %}
{% data reusables.advanced-security.starter-workflow-overview %} {% data variables.product.prodname_code_scanning_capc %} starter workflows are only available for your repository if {% data variables.product.prodname_code_scanning %} is enabled.
{% data reusables.code-scanning.billing %}
{% data reusables.repositories.navigate-to-repo %} {% data reusables.repositories.actions-tab %}
- If the repository has already at least one workflow set up and running, click New workflow and go to step 5. If there are currently no workflows configured for the repository, go to the next step.

- Scroll down to the "Security" category and click Configure under the workflow you want to configure, or click View all to see all available security workflows.

- On the right pane of the workflow page, click Documentation and follow the on-screen instructions to tailor the workflow to your needs.
 For more information, see "Using starter workflows" and "Configuring {% data variables.product.prodname_code_scanning %}."


{% endif %}
Setting up {% data variables.product.prodname_code_scanning %} manually
{% ifversion fpt %}
You can set up {% data variables.product.prodname_code_scanning %} in any public repository where you have write access.
{% endif %}
{% data reusables.code-scanning.billing %} {% data reusables.repositories.navigate-to-repo %} {% data reusables.repositories.sidebar-security %}
-
To the right of "{% data variables.product.prodname_code_scanning_capc %} alerts", click Set up {% data variables.product.prodname_code_scanning %}.{% ifversion ghec or ghes or ghae %} If {% data variables.product.prodname_code_scanning %} is missing, you need to ask an organization owner or repository administrator to enable {% data variables.product.prodname_GH_advanced_security %}.{% endif %} For more information, see "Managing security and analysis settings for your organization" or "Managing security and analysis settings for your repository."

-
Under "Get started with {% data variables.product.prodname_code_scanning %}", click Set up this workflow on the {% data variables.product.prodname_codeql_workflow %} or on a third-party workflow.
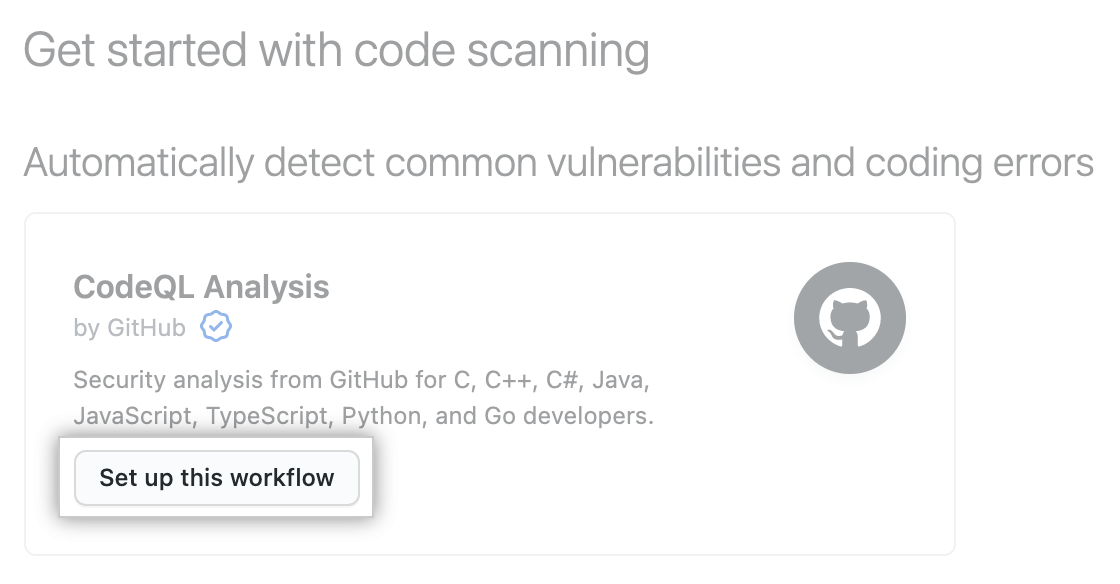 Workflows are only displayed if they are relevant for the programming languages detected in the repository. The {% data variables.product.prodname_codeql_workflow %} is always displayed, but the "Set up this workflow" button is only enabled if {% data variables.product.prodname_codeql %} analysis supports the languages present in the repository.
 -
To customize how {% data variables.product.prodname_code_scanning %} scans your code, edit the workflow.
Generally you can commit the {% data variables.product.prodname_codeql_workflow %} without making any changes to it. However, many of the third-party workflows require additional configuration, so read the comments in the workflow before committing.
For more information, see "Configuring {% data variables.product.prodname_code_scanning %}."
-
Use the Start commit drop-down, and type a commit message.

-
Choose whether you'd like to commit directly to the default branch, or create a new branch and start a pull request.

-
Click Commit new file or Propose new file.


In the default {% data variables.product.prodname_codeql_workflow %}, {% data variables.product.prodname_code_scanning %} is configured to analyze your code each time you either push a change to the default branch or any protected branches, or raise a pull request against the default branch. As a result, {% data variables.product.prodname_code_scanning %} will now commence.
The on:pull_request and on:push triggers for code scanning are each useful for different purposes. For more information, see "Scanning pull requests" and "Scanning on push."
Bulk set up of {% data variables.product.prodname_code_scanning %}
You can set up {% data variables.product.prodname_code_scanning %} in many repositories at once using a script. If you'd like to use a script to raise pull requests that add a {% data variables.product.prodname_actions %} workflow to multiple repositories, see the jhutchings1/Create-ActionsPRs repository for an example using PowerShell, or nickliffen/ghas-enablement for teams who do not have PowerShell and instead would like to use NodeJS.
Viewing the logging output from {% data variables.product.prodname_code_scanning %}
After setting up {% data variables.product.prodname_code_scanning %} for your repository, you can watch the output of the actions as they run.
{% data reusables.repositories.actions-tab %}
You'll see a list that includes an entry for running the {% data variables.product.prodname_code_scanning %} workflow. The text of the entry is the title you gave your commit message.

-
Click the entry for the {% data variables.product.prodname_code_scanning %} workflow.
-
Click the job name on the left. For example, Analyze (LANGUAGE).

-
Review the logging output from the actions in this workflow as they run.
-
Once all jobs are complete, you can view the details of any {% data variables.product.prodname_code_scanning %} alerts that were identified. For more information, see "Managing {% data variables.product.prodname_code_scanning %} alerts for your repository."
{% note %}
Note: If you raised a pull request to add the {% data variables.product.prodname_code_scanning %} workflow to the repository, alerts from that pull request aren't displayed directly on the {% data variables.product.prodname_code_scanning_capc %} page until the pull request is merged. If any alerts were found you can view these, before the pull request is merged, by clicking the n alerts found link in the banner on the {% data variables.product.prodname_code_scanning_capc %} page.
{% ifversion fpt or ghes > 3.1 or ghae or ghec %}
 {% else %}
 {% endif %}
{% endnote %}
Understanding the pull request checks
Each {% data variables.product.prodname_code_scanning %} workflow you set to run on pull requests always has at least two entries listed in the checks section of a pull request. There is one entry for each of the analysis jobs in the workflow, and a final one for the results of the analysis.
The names of the {% data variables.product.prodname_code_scanning %} analysis checks take the form: "TOOL NAME / JOB NAME (TRIGGER)." For example, for {% data variables.product.prodname_codeql %}, analysis of C++ code has the entry "{% data variables.product.prodname_codeql %} / Analyze (cpp) (pull_request)." You can click Details on a {% data variables.product.prodname_code_scanning %} analysis entry to see logging data. This allows you to debug a problem if the analysis job failed. For example, for {% data variables.product.prodname_code_scanning %} analysis of compiled languages, this can happen if the action can't build the code.

When the {% data variables.product.prodname_code_scanning %} jobs complete, {% data variables.product.prodname_dotcom %} works out whether any alerts were added by the pull request and adds the "{% data variables.product.prodname_code_scanning_capc %} results / TOOL NAME" entry to the list of checks. After {% data variables.product.prodname_code_scanning %} has been performed at least once, you can click Details to view the results of the analysis. If you used a pull request to add {% data variables.product.prodname_code_scanning %} to the repository, you will initially see {% ifversion fpt or ghes > 3.2 or ghae-issue-3891 or ghec %}an "Analysis not found"{% else %}a "Missing analysis"{% endif %} message when you click Details on the "{% data variables.product.prodname_code_scanning_capc %} results / TOOL NAME" check.
{% ifversion fpt or ghes > 3.2 or ghae-issue-3891 or ghec %}

The table lists one or more categories. Each category relates to specific analyses, for the same tool and commit, performed on a different language or a different part of the code. For each category, the table shows the two analyses that {% data variables.product.prodname_code_scanning %} attempted to compare to determine which alerts were introduced or fixed in the pull request.
For example, in the screenshot above, {% data variables.product.prodname_code_scanning %} found an analysis for the merge commit of the pull request, but no analysis for the head of the main branch.
{% else %}
 {% endif %}
{% ifversion fpt or ghes > 3.2 or ghae-issue-3891 or ghec %}
Reasons for the "Analysis not found" message
{% else %}
Reasons for the "Missing analysis" message
{% endif %}
After {% data variables.product.prodname_code_scanning %} has analyzed the code in a pull request, it needs to compare the analysis of the topic branch (the branch you used to create the pull request) with the analysis of the base branch (the branch into which you want to merge the pull request). This allows {% data variables.product.prodname_code_scanning %} to compute which alerts are newly introduced by the pull request, which alerts were already present in the base branch, and whether any existing alerts are fixed by the changes in the pull request. Initially, if you use a pull request to add {% data variables.product.prodname_code_scanning %} to a repository, the base branch has not yet been analyzed, so it's not possible to compute these details. In this case, when you click through from the results check on the pull request you will see the {% ifversion fpt or ghes > 3.2 or ghae-issue-3891 or ghec %}"Analysis not found"{% else %}"Missing analysis for base commit SHA-HASH"{% endif %} message.
There are other situations where there may be no analysis for the latest commit to the base branch for a pull request. These include:
-
The pull request has been raised against a branch other than the default branch, and this branch hasn't been analyzed.
To check whether a branch has been scanned, go to the {% data variables.product.prodname_code_scanning_capc %} page, click the Branch drop-down and select the relevant branch.
{% ifversion fpt or ghes > 3.1 or ghae or ghec %}
 {% else %}
 {% endif %}
The solution in this situation is to add the name of the base branch to the on:push and on:pull_request specification in the {% data variables.product.prodname_code_scanning %} workflow on that branch and then make a change that updates the open pull request that you want to scan.
-
The latest commit on the base branch for the pull request is currently being analyzed and analysis is not yet available.
Wait a few minutes and then push a change to the pull request to retrigger {% data variables.product.prodname_code_scanning %}.
-
An error occurred while analyzing the latest commit on the base branch and analysis for that commit isn't available.
Merge a trivial change into the base branch to trigger {% data variables.product.prodname_code_scanning %} on this latest commit, then push a change to the pull request to retrigger {% data variables.product.prodname_code_scanning %}.
Next steps
After setting up {% data variables.product.prodname_code_scanning %}, and allowing its actions to complete, you can:
- View all of the {% data variables.product.prodname_code_scanning %} alerts generated for this repository. For more information, see "Managing {% data variables.product.prodname_code_scanning %} alerts for your repository."
- View any alerts generated for a pull request submitted after you set up {% data variables.product.prodname_code_scanning %}. For more information, see "Triaging {% data variables.product.prodname_code_scanning %} alerts in pull requests."
- Set up notifications for completed runs. For more information, see "Configuring notifications."
- View the logs generated by the {% data variables.product.prodname_code_scanning %} analysis. For more information, see "Viewing {% data variables.product.prodname_code_scanning %} logs."
- Investigate any problems that occur with the initial setup of {% data variables.product.prodname_codeql %} {% data variables.product.prodname_code_scanning %}. For more information, see "Troubleshooting the {% data variables.product.prodname_codeql %} workflow."
- Customize how {% data variables.product.prodname_code_scanning %} scans the code in your repository. For more information, see "Configuring {% data variables.product.prodname_code_scanning %}."