298 lines
15 KiB
Markdown
298 lines
15 KiB
Markdown
# Managing Airbyte Cloud
|
|
|
|
This page will help you manage your Airbyte Cloud workspaces and understand Airbyte Cloud limitations.
|
|
|
|
## Manage your Airbyte Cloud workspace
|
|
|
|
An Airbyte Workspace allows you to collaborate with other users and manage connections under a shared billing account.
|
|
|
|
:::info
|
|
Airbyte [credits](https://airbyte.com/pricing) are assigned per workspace and cannot be transferred between workspaces.
|
|
:::
|
|
|
|
### Add users to your workspace
|
|
|
|
To add a user to your workspace:
|
|
|
|
1. On the Airbyte Cloud dashboard, click **Settings** in the navigation bar.
|
|
2. In the Workspace Settings sidebar, click **Access Management**.
|
|
3. Click **+ New user**.
|
|
4. On the **Add new users** dialog, enter the email address of the user you want to invite to your workspace. Click **Send invitation**.
|
|
|
|
:::info
|
|
The user will have access to only the workspace you invited them to. Also note that they will be added as a workspace admin by default.
|
|
:::
|
|
|
|
### Switch between multiple workspaces
|
|
|
|
To switch between workspaces:
|
|
|
|
1. On the [Airbyte Cloud](http://cloud.airbyte.io) dashboard, click the current workspace name under the Airbyte logo in the navigation bar.
|
|
|
|
2. Click **View all workspaces**.
|
|
|
|
3. Click the name of the workspace you want to switch to.
|
|
|
|
### Rename a workspace
|
|
|
|
To rename a workspace:
|
|
|
|
1. On the Airbyte Cloud dashboard, click **Settings** in the navigation bar.
|
|
|
|
2. In the Workspace Settings sidebar, click **General Settings**.
|
|
|
|
3. In the Workspace name field, enter the new name for your workspace. Click **Save**.
|
|
|
|
### Delete a workspace
|
|
|
|
To delete a workspace:
|
|
|
|
1. On the Airbyte Cloud dashboard, click **Settings** in the navigation bar.
|
|
|
|
2. In the Workspace Settings sidebar, click **General Settings**.
|
|
|
|
3. Click **Delete your workspace**.
|
|
|
|
### Single workspace vs. multiple workspaces
|
|
|
|
You can use one or multiple workspaces with Airbyte Cloud.
|
|
|
|
#### Access
|
|
| Number of workspaces | Benefits | Considerations |
|
|
|----------------------|-------------------------------------------------------------------------------|---------------------------------------------------------------------------------------------------------------------------------------------|
|
|
| Single | All users in a workspace have access to the same data. | If you add a user to a workspace, you cannot limit their access to specific data within that workspace. |
|
|
| Multiple | You can create multiple workspaces to allow certain users to access the data. | Since you have to manage user access for each workspace individually, it can get complicated if you have many users in multiple workspaces. |
|
|
|
|
#### Billing
|
|
| Number of workspaces | Benefits | Considerations |
|
|
|----------------------|-------------------------------------------------------------------------------|---------------------------------------------------------------------------------------------------------------------------------------------|
|
|
| Single | You can use the same payment method for all purchases. | Credits pay for the use of resources in a workspace when you run a sync. Resource usage cannot be divided and paid for separately (for example, you cannot bill different departments in your organization for the usage of some credits in one workspace). |
|
|
| Multiple | Workspaces are independent of each other, so you can use a different payment method card for each workspace (for example, different credit cards per department in your organization). | You can use the same payment method for different workspaces, but each workspace is billed separately. Managing billing for each workspace can become complicated if you have many workspaces. |
|
|
|
|
## Manage Airbyte Cloud notifications
|
|
|
|
To set up Slack notifications:
|
|
|
|
1. On the Airbyte Cloud dashboard, click **Settings** in the navigation bar.
|
|
|
|
2. In the Workspace Settings sidebar, click **Notifications.**
|
|
|
|
3. [Create an Incoming Webhook for Slack](https://api.slack.com/messaging/webhooks).
|
|
|
|
4. Navigate back to the Airbyte Cloud dashboard > Settings > Notifications and enter the Webhook URL. Click **Save changes**.
|
|
|
|
5. Toggle the **Send notifications when sync fails** and **Send notifications when sync succeeds** buttons as required.
|
|
|
|
## Understand Airbyte Cloud limits
|
|
|
|
Understanding the following limitations will help you better manage Airbyte Cloud:
|
|
|
|
* Max number of workspaces per user: 100
|
|
* Max number of sources in a workspace: 100
|
|
* Max number of destinations in a workspace: 100
|
|
* Max number of connection in a workspace: 100
|
|
* Max number of streams that can be returned by a source in a discover call: 1K
|
|
* Max number of streams that can be configured to sync in a single connection: 1K
|
|
* Size of a single record: 100MB
|
|
* Shortest sync schedule: Every 60 min
|
|
* Schedule accuracy: +/- 30 min
|
|
|
|
## View the sync log summary
|
|
The sync log summary shows if a sync succeeded, failed, cancelled, or is currently running.
|
|
|
|
To view the sync log summary:
|
|
1. On the [Airbyte Cloud](http://cloud.airbyte.io/) dashboard, click **Connections** in the navigation bar.
|
|
|
|
The Connections page displays.
|
|
|
|
2. Click a connection in the list to view its sync history.
|
|
|
|
3. Under Sync History, a list of syncs for that connection is displayed.
|
|
|
|
The sync status is displayed (Succeeded, Cancelled, Failed, or Running) along with the [summary of the sync log](#sync-log-summary).
|
|
|
|
4. For more information about a sync, click the sync log dropdown.
|
|
|
|
### Sync log summary
|
|
#### Succeeded
|
|
The log summary for a successful sync shows the following data.
|
|
|
|
| Log | Description |
|
|
|--------------------------------|---------------------------------------------------------------------------------------------------------------------------------------------------------|
|
|
| x GB (also measured in KB, MB) | Amount of data moved during the sync. If basic normalization is on, the amount of data would not change since normalization occurs in the destination. |
|
|
| x emitted records | Number of records read from the source during the sync. |
|
|
| x committed records | Number of records the destination confirmed it received. |
|
|
| xh xm xs | Total time (hours, minutes, seconds) for the sync and basic normalization, if enabled, to complete. |
|
|
| Sync or Reset | The action that was performed (either a sync or a [reset](https://docs.airbyte.com/operator-guides/reset/)). |
|
|
|
|
:::note
|
|
|
|
In a successful sync, the number of emitted records and committed records should be the same.
|
|
|
|
:::
|
|
|
|
#### Cancelled
|
|
The log summary for a cancelled sync may show the following data.
|
|
|
|
| Log | Description |
|
|
|----------------|-------------------------------------------------------------------------------------------------|
|
|
| NaN Bytes | Since the sync was cancelled, the log does not show how much data was moved before cancelling. |
|
|
| No records | Since the sync was cancelled, the log does not show emitted or committed records. |
|
|
| xh xm xs | Total time (hours, minutes, seconds) between the beginning of sync and when it was cancelled. |
|
|
| Sync or Reset | The action that was performed (either a sync or a reset). |
|
|
| Failure Origin | The cause of the sync cancellation. |
|
|
|
|
:::note
|
|
|
|
Airbyte will try to sync your data three times. After a third failure, it will stop attempting to sync.
|
|
|
|
:::
|
|
|
|
#### Failed
|
|
The log summary for a failed sync may show the following data.
|
|
|
|
| Log | Description |
|
|
|----------------|---------------------------------------------------------------------------------------------|
|
|
| NaN Bytes | Since the sync failed, the amount of data is zero. |
|
|
| No records | Since the sync failed, there are no emitted or committed records. |
|
|
| xh xm xs | Total time (hours, minutes, seconds) between the beginning of the sync and when it failed. |
|
|
| Sync or Reset | The action that was performed (either a sync or a reset). |
|
|
| Failure Origin | The cause of the sync failure. |
|
|
|
|
#### Running
|
|
The sync log summary displays **Running** when the sync is actively running.
|
|
|
|
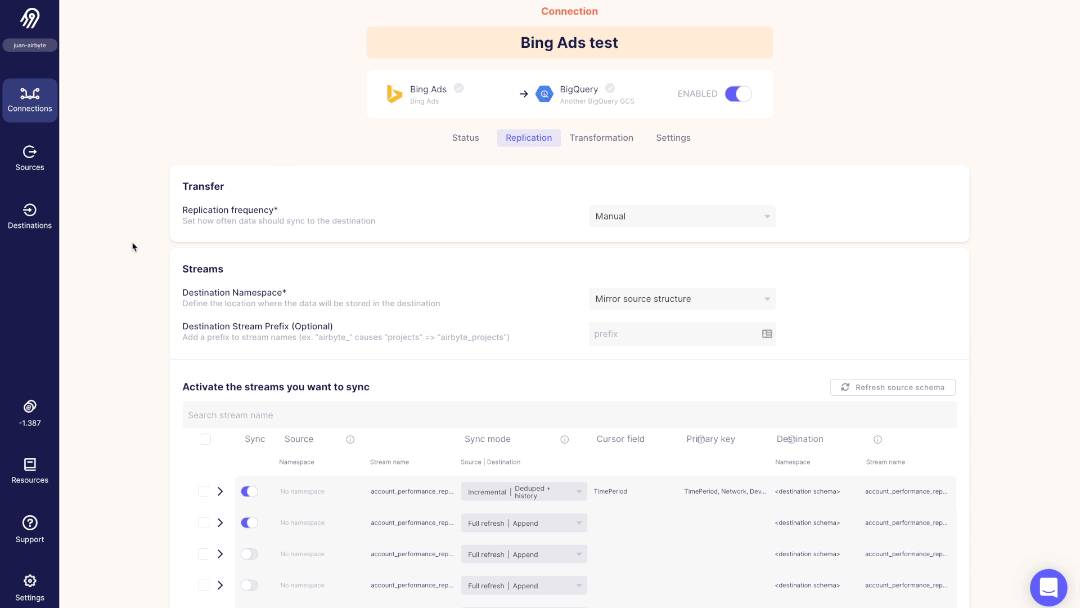
## Edit stream configuration
|
|
|
|
1. On the [Airbyte Cloud](http://cloud.airbyte.io) dashboard, click **Connections** in the navigation bar and then click a connection in the list you want to change.
|
|
|
|
The **Connection** page displays.
|
|
|
|
2. Click **Replication**.
|
|
|
|
The **Replication** tab displays.
|
|
|
|
The **Transfer** and **Streams** settings include the following parameters:
|
|
|
|
| Parameter | Description |
|
|
|---------------------------|-------------------------------------------------------------------------------------------------------------------------------------------|
|
|
| Replication Frequency | How often the data syncs |
|
|
| [Destination Namespace](https://docs.airbyte.com/understanding-airbyte/namespaces/) | Where the replicated data is written |
|
|
| Destination Stream Prefix | Helps you identify streams from different connectors |
|
|
|
|
:::note
|
|
|
|
These parameters apply to all streams in the connection.
|
|
|
|
:::
|
|
|
|
If you need to use [cron scheduling](http://www.quartz-scheduler.org/documentation/quartz-2.3.0/tutorials/crontrigger.html):
|
|
1. In the **Replication Frequency** dropdown, click **Cron**.
|
|
2. Enter a cron expression and choose a time zone to create a sync schedule.
|
|
|
|
:::info
|
|
|
|
Only one sync per connection can run at a time. If cron schedules a sync to run before the last sync finishes, the sync will start after the last one completes.
|
|
|
|
:::
|
|
|
|
In the **Activate the streams you want to sync section**, you can make changes to any stream you choose.
|
|
|
|
To search for a stream:
|
|
|
|
1. Click the **Search stream name** search box.
|
|
|
|
2. Type the name of the stream you want to find.
|
|
|
|
3. Streams matching your search are displayed in the list.
|
|
|
|
To change individual stream configuration:
|
|
|
|
|
|
|
|
1. In the **Sync** column of the stream, toggle the sync on or off.
|
|
|
|
2. Click the dropdown arrow in the **Sync mode** column and select the sync mode you want to apply.
|
|
|
|
:::note
|
|
|
|
Depending on the sync mode you select, you may need to choose a cursor or primary key.
|
|
|
|
:::
|
|
|
|
3. If there is a dropdown arrow in the **Cursor** or **Primary key** fields, click the dropdown arrow and choose the cursor or primary key.
|
|
|
|
To change multiple stream configurations:
|
|
|
|
|
|
|
|
1. Click the first checkbox in the table header to select all streams in the connection.
|
|
|
|
2. Deselect the checkboxes of streams you do not want to apply these changes to.
|
|
|
|
3. In the highlighted header of the table, toggle the sync on or off.
|
|
|
|
4. Click the dropdown arrow in the **Sync mode** column and select the sync mode you want to apply to these streams.
|
|
|
|
5. If there is a dropdown arrow in the **Cursor** or **Primary key** fields of the highlighted table header, click the dropdown arrow and choose the cursor or primary key.
|
|
|
|
6. Click **Apply** to apply these changes to the streams you selected, or click **Cancel** to discard the changes.
|
|
|
|
To save the changes:
|
|
1. Click **Save changes**, or click **Cancel** to discard the changes.
|
|
|
|
2. The **Stream configuration changed** dialog displays. This gives you the option to reset streams when you save the changes.
|
|
|
|
:::caution
|
|
|
|
Airbyte recommends that you reset the streams. A reset will delete data in the destination of the affected streams and then re-sync that data. Skipping the reset is discouraged and might lead to unexpected behavior.
|
|
|
|
:::
|
|
|
|
3. Click **Save connection**, or click **Cancel** to close the dialog.
|
|
|
|
To refresh the source schema:
|
|
1. Click **Refresh source schema** to fetch the schema of your data source.
|
|
|
|
2. If there are changes to the schema, the **Refreshed source schema** dialog displays them.
|
|
|
|
## Buy credits
|
|
|
|
This section guides you through purchasing credits on Airbyte Cloud. An Airbyte [credit](https://airbyte.com/pricing) is a unit of measure used to pay for Airbyte resources when you run a sync.
|
|
|
|
To buy credits:
|
|
|
|
1. On the Airbyte Cloud dashboard, click the **coin icon** in the navigation bar.
|
|
|
|
The Credits page displays.
|
|
|
|
2. If you are unsure of how many credits you need, click **Talk to Sales** to find the right amount for your team.
|
|
|
|
3. Click **Buy credits**. The Stripe payment page displays.
|
|
|
|
4. If you want to change the amount of credits, click Qty **200**. The **Update quantity** dialog displays, and you can either type the amount or use minus (**-**) or plus (**+**) to change the quantity. Click **Update**.
|
|
|
|
:::note
|
|
Purchase limits:
|
|
* Minimum: 100 credits
|
|
* Maximum: 999 credits
|
|
:::
|
|
|
|
To buy more credits or a subscription plan, reach out to [Sales](https://airbyte.com/talk-to-sales).
|
|
|
|
5. Fill out the payment information.
|
|
|
|
After you enter your billing address, sales tax is calculated and added to the total.
|
|
|
|
6. Click **Pay**.
|
|
|
|
Your payment is processed, and the Credits page displays the updated quantity of credits, total credit usage, and the credit usage per connection.
|
|
|
|
A receipt for your purchase is sent to your email. [Email us](mailto:ar@airbyte.io) for an invoice.
|
|
|
|
:::note
|
|
|
|
Credits expire after one year if they are not used.
|
|
|
|
:::
|